
How to use stayV Host · EP. 14
Using stayV HostSeparate public guidance from booked-guest information
At a glance
Show nearby stations publicly, exact addresses to booked guests and entry codes when it is time to enter. Set each item's audience and check the guest view.


When writing directions, you may wonder how much to make public. Nearby stations can be shared openly, while an exact address or door code should reach booked guests when needed. Let’s separate that information and check the actual guest view.
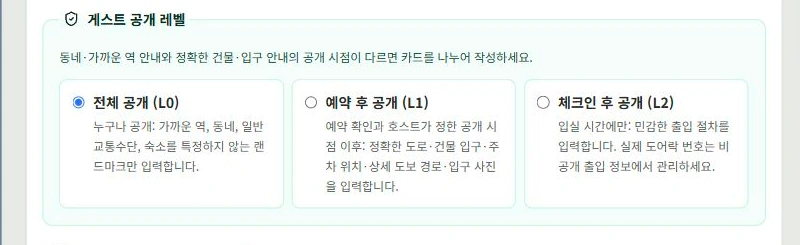
stayV uses three disclosure levels. The screen also labels them L0, L1 and L2.
| Screen label | Who sees it and when | Suitable information |
|---|---|---|
| Public (L0) | Anyone opening the link | Property introduction, neighbourhood and nearby stations |
| After booking (L1) | Booked guests who enter a code | Detailed address, entrance directions and Wi-Fi |
| After check-in (L2) | Booked guests once entry time arrives | Building and door codes and entry procedures |
At a glance
- Open the guest link without a code to check public information first.
- Choose Public, After booking or After check-in for each arrival card.
- Put Wi-Fi, addresses and entry codes in their dedicated fields.
- Plus lets you set arrival and entry-guidance times for each reservation.
- Reopen the guest link to check that only the intended information is visible.
Learn more
1. Open the guest view before entering a code
Open a published property’s guest link in a logged-out browser, such as an incognito window. What appears is public (L0) guidance. The introduction and approximate location may be visible, but detailed addresses, unit numbers and entry codes should be hidden.
Saving a detailed address in the editor does not expose it to everyone. However, an address written in the introduction or visible in a photo can be exposed, so check those too.
2. Choose each card’s audience
Use Guest disclosure level on arrival cards. Public suits neighbourhood information; After booking suits detailed routes; After check-in suits entry procedures. Check both the chosen level and the actual release dates and times.
Manage building, door-lock and key-box codes in reservation-specific access fields rather than ordinary cards. Save Wi-Fi in Stay information and the exact address in Location.
3. Use a shared property code on Free
On Free, set one stayV Guide Code per property and share it separately. Entering it opens After booking (L1) information such as the detailed address, map and Wi-Fi.
The shared code does not verify the booker’s identity or stay dates. It therefore does not open After check-in (L2) entry codes or reservation-specific contact details. Send actual door codes separately through your usual channel, such as the booking-platform conversation.
4. Set reservation codes and times on Plus
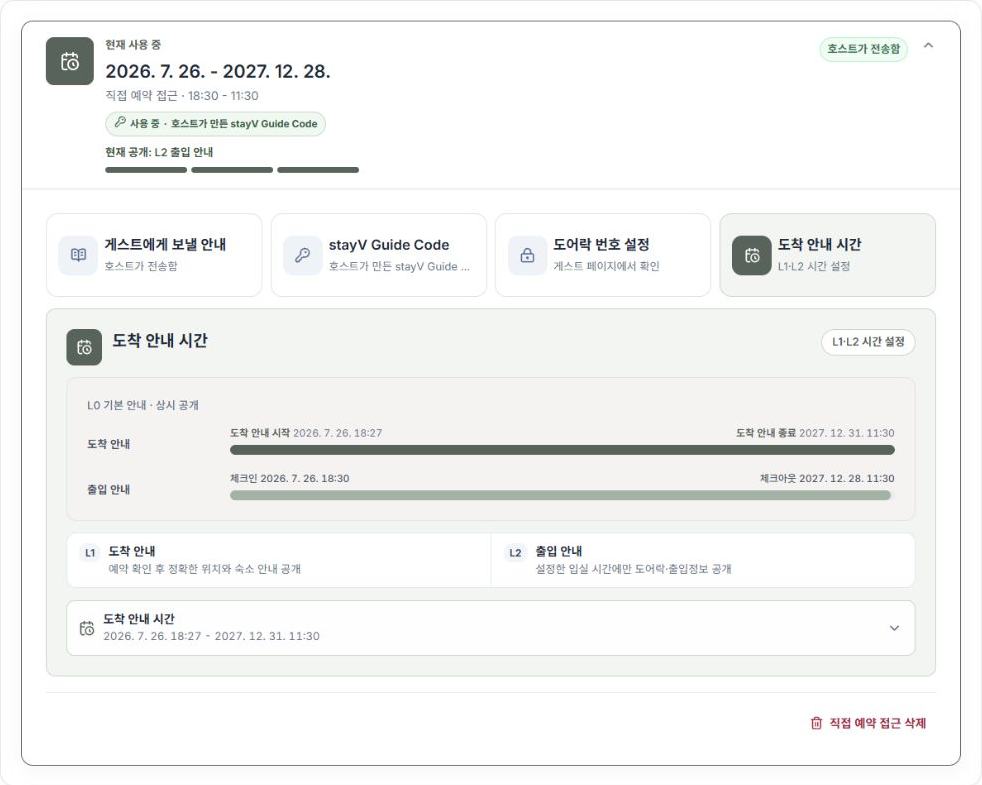
Go to Reservation operations → Reservation schedule and access management and select the property and reservation. Check the current method under stayV Guide Code and the arrival (L1) and entry (L2) windows under Arrival guidance time. A newly linked reservation card may call this area Usage time.
Entry guidance should open later and close earlier than arrival guidance. Keep the entire entry window within the arrival window.
Plus also has a shared property code, but it provides limited arrival information outside reservation periods as a fallback. It does not open all guidance at all times. Host contact details may also open at a different time from the detailed address.
5. Check what opens through the guest link
After saving, check the actual link first without a code and then with one. Before entry time, hidden entry codes are expected.
On Plus, Wi-Fi name and password release times can also depend on reservation settings. If an item is missing, check reservation dates, code method and that item’s release time, in that order.
6. Prepare a short guest message
Guests do not need an explanation of L0, L1 and L2. Tell them how to open the guide and when entry information becomes available.
You can view the property guide at the link below. If asked for a code, enter the stayV Guide Code we sent you. Entry instructions become available at check-in time.
Leave the address and entry method in the original booking-platform conversation too. Changing disclosure times in stayV does not change the real lock’s code or operating schedule. Check the lock separately.
Check your progress
- Detailed addresses and entry codes are hidden before code entry.
- You checked the reservation’s arrival and entry windows.
- You prepared the Guide Code explanation and entry message.
Availability and things to know
Free’s shared property code opens After booking (L1) guidance. Reservation-specific codes and timing require the paid Plus plan. See Check your account and plan.
Read next
Episode 13 · What does the stayV guide look like to a guest?
Episode 15 · Find schedules, access details and messages in Reservation operations